Guide to Install and play with XMage
XMage Launcher
The easiest way to install and play XMage is to use the XMage Launcher.
The only thing you need before is a working java (see point 1 in the following steps).
Download it from here: Launcher
It installs its own Java and XMage and can start XMage server and/or client and updates xmage and java if updates are provided. This replaces the points 2-3 of the 5 easy steps.
The launcher creates some config/settings files in the directory the launcher.jar is located and creates also two subdirectories. One for java and one for xmage.
So best way to use the launcher is to create a new subdirectory (e.g. named xmage) and move/save the downloaded launcher jar file to this directory.
Then execute the launcher jar to install xmage and the xmage specific java.
All files will then be located in the directory you moved the launcher jar file to.
However, you can also do it manually step by step:
More detailed Mac OS install instructions
1) Check the preconditions
XMage is written in Java. So it can be used on different systems like Windows, Linux or Mac OS. To run XMage or even the xmage Launcher on these systems it needs a Java Runtime Environment that you have to download and install, if it’s not already installed on your system.
On this website you can check, if you can run java applications on your system (that means java is already installed on your system).
http://www.java.com/verify/
If it’s not installed you can download it from here for different systems:
http://www.java.com/en/download/manual.jsp
Use at least a 1.7.x version (versions previous to 1.7 are no longer supported from XMage).
2) Download and install XMage
Download the newest version of XMage here:
http://XMage.de/
If you want to play online using the public server, download the newest "dev" version of XMage (if one is offered), because this is the one that's installed on the public server.
You unpack the downloaded zip file to the location you like. There is no special install routine needed for MAGE, because it runs directly from the folder you unpacked it to.
3) Starting XMage
MAGE consists of a server and a client component. If you only like to play with other people on a public server, you only need the client component of XMage.
You only need to use the server component of XMage, if you like to operate your own XMage server. That can be useful if you want to play with others in a closed environment (local network) or you want to use features of XMage that are normally limited or deactivated on public servers (like playing against the AI opponent of XMage).
In the XMage folder you unpacked are two subfolder named “mage-client” and “mage-server”. In this folders are beside the applications itself the scripts to start the XMage client or XMage server. Depending on your operating system you can use:
Windows XP/Vista or older Windows systems
../mage-client/startClient.bat - starts the client only
../mage-server/startServer.bat - starts the server only
../startMage.bat - starts both server and client
Windows 7 or newer
../mage-client/startClientWin7.bat - starts the client only
../mage-server/startServerWin7.bat - starts the server only
../startMageWin7.bat - starts both server and client
Linux
../mage-client/startClient.sh - starts the client only
../mage-server/startServer.sh - starts the server only
../startMage.sh - starts both server and client
Due to creating and repacking the zip files on windows you have to perform a chmod 755 *.sh command to make the shell files executable.
Mac
../mage-client/startClient.command - starts the client only
../mage-server/startServer.command - starts the server only
Due to creating and repacking the zip files on windows you have to go in the terminal and perform a command called chmod +x startServer.command and chmod +x startClient.command to give the terminal access to the command files.
See also here
A good practice to handle this is to create a shortcut of the script you use regularly and copy the shortcut to your desktop to have an easy way to start XMage.
4) Getting image resources
If you start the client for the first time it’s useful to download some resources from the internet to make the use of XMage more enjoyable.
a) Download images for the symbols of mana, actions (like tap) and extensions. To do this you use the menu “Symbols” on the top right menu area of the client.
You confirm to download and see a result dialog, if the download was successful.
b) Download the card images from the wizards or cardinfo site.
You have to use the menu “Images” on the top right menu of the client.
It will open a small dialog, where you can select the site from where you download. To download all the pictures can need some time.
5) Connecting to a XMage server
Use “Connect” from the client menu.
In the opened connect dialog choose the appropriate server from the list of public server you see if you use the “Find...” button. It will fill out the server name and port number of the selected server. Enter the username you want to use on the server and push the “Connect” button to connect to the server.
If you’re successful connected to the server, use the menu “game”, to enter the main lobby of the server and showing a list of all opened tables of matches and/or tournaments currently running or waiting for players to start. On the right side you also see a list of players currently connected to the server.
If a match or tournament needs more players, you see a button in the action column “Join” on the right side of the table line. Push this button to join the match.

Depending on the format of the table you have to select a deck to use, that has to be suitable for the format that was set to the table.
Alternatively you can open a table for a match or a tournament by yourself with the buttons on the top left side, so that others can join your table.
There are a lot of sample decks included in the client if you like to start to play constructed formats immediately without building a deck.
Navigate with the file open dialog to:
..\mage-client\release\sample-decks\
Have fun!
See you on the public server.

The easiest way to install and play XMage is to use the XMage Launcher.
The only thing you need before is a working java (see point 1 in the following steps).
Download it from here: Launcher
It installs its own Java and XMage and can start XMage server and/or client and updates xmage and java if updates are provided. This replaces the points 2-3 of the 5 easy steps.
The launcher creates some config/settings files in the directory the launcher.jar is located and creates also two subdirectories. One for java and one for xmage.
So best way to use the launcher is to create a new subdirectory (e.g. named xmage) and move/save the downloaded launcher jar file to this directory.
Then execute the launcher jar to install xmage and the xmage specific java.
All files will then be located in the directory you moved the launcher jar file to.
However, you can also do it manually step by step:
More detailed Mac OS install instructions
1) Check the preconditions
XMage is written in Java. So it can be used on different systems like Windows, Linux or Mac OS. To run XMage or even the xmage Launcher on these systems it needs a Java Runtime Environment that you have to download and install, if it’s not already installed on your system.
On this website you can check, if you can run java applications on your system (that means java is already installed on your system).
http://www.java.com/verify/
If it’s not installed you can download it from here for different systems:
http://www.java.com/en/download/manual.jsp
Use at least a 1.7.x version (versions previous to 1.7 are no longer supported from XMage).
2) Download and install XMage
Download the newest version of XMage here:
http://XMage.de/
If you want to play online using the public server, download the newest "dev" version of XMage (if one is offered), because this is the one that's installed on the public server.
You unpack the downloaded zip file to the location you like. There is no special install routine needed for MAGE, because it runs directly from the folder you unpacked it to.
3) Starting XMage
MAGE consists of a server and a client component. If you only like to play with other people on a public server, you only need the client component of XMage.
You only need to use the server component of XMage, if you like to operate your own XMage server. That can be useful if you want to play with others in a closed environment (local network) or you want to use features of XMage that are normally limited or deactivated on public servers (like playing against the AI opponent of XMage).
In the XMage folder you unpacked are two subfolder named “mage-client” and “mage-server”. In this folders are beside the applications itself the scripts to start the XMage client or XMage server. Depending on your operating system you can use:
Windows XP/Vista or older Windows systems
../mage-client/startClient.bat - starts the client only
../mage-server/startServer.bat - starts the server only
../startMage.bat - starts both server and client
Windows 7 or newer
../mage-client/startClientWin7.bat - starts the client only
../mage-server/startServerWin7.bat - starts the server only
../startMageWin7.bat - starts both server and client
Linux
../mage-client/startClient.sh - starts the client only
../mage-server/startServer.sh - starts the server only
../startMage.sh - starts both server and client
Due to creating and repacking the zip files on windows you have to perform a chmod 755 *.sh command to make the shell files executable.
Mac
../mage-client/startClient.command - starts the client only
../mage-server/startServer.command - starts the server only
Due to creating and repacking the zip files on windows you have to go in the terminal and perform a command called chmod +x startServer.command and chmod +x startClient.command to give the terminal access to the command files.
See also here
A good practice to handle this is to create a shortcut of the script you use regularly and copy the shortcut to your desktop to have an easy way to start XMage.
4) Getting image resources
If you start the client for the first time it’s useful to download some resources from the internet to make the use of XMage more enjoyable.
a) Download images for the symbols of mana, actions (like tap) and extensions. To do this you use the menu “Symbols” on the top right menu area of the client.
- Mage4Symbols.jpg (6.35 KiB) Viewed 668335 times
You confirm to download and see a result dialog, if the download was successful.
b) Download the card images from the wizards or cardinfo site.
You have to use the menu “Images” on the top right menu of the client.
- Mage4Images.jpg (6.34 KiB) Viewed 668335 times
It will open a small dialog, where you can select the site from where you download. To download all the pictures can need some time.
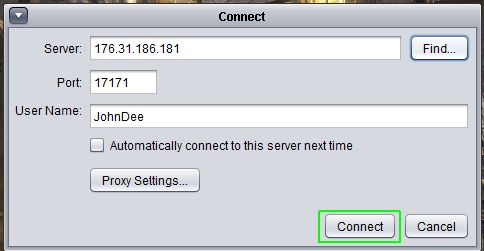
5) Connecting to a XMage server
Use “Connect” from the client menu.
- Mage4Connect.jpg (10.56 KiB) Viewed 668335 times
In the opened connect dialog choose the appropriate server from the list of public server you see if you use the “Find...” button. It will fill out the server name and port number of the selected server. Enter the username you want to use on the server and push the “Connect” button to connect to the server.
If you’re successful connected to the server, use the menu “game”, to enter the main lobby of the server and showing a list of all opened tables of matches and/or tournaments currently running or waiting for players to start. On the right side you also see a list of players currently connected to the server.
- Mage5Players.jpg (6.35 KiB) Viewed 668339 times
If a match or tournament needs more players, you see a button in the action column “Join” on the right side of the table line. Push this button to join the match.
Depending on the format of the table you have to select a deck to use, that has to be suitable for the format that was set to the table.
Alternatively you can open a table for a match or a tournament by yourself with the buttons on the top left side, so that others can join your table.
- Mage5NewTable.jpg (3.43 KiB) Viewed 668335 times
There are a lot of sample decks included in the client if you like to start to play constructed formats immediately without building a deck.
Navigate with the file open dialog to:
..\mage-client\release\sample-decks\
Have fun!
See you on the public server.