Photoshoppers Needed
Moderator: CCGHQ Admins
 Photoshoppers Needed
![]() by skibulk » 21 Mar 2013, 20:24
by skibulk » 21 Mar 2013, 20:24
This Guide is Outdated. Please watch the tutorial videos instead. Here's the latest: processing kit & scan sample.
This guide outlines how to process raw card scans into high quality images for for the CCGHQ project and MTG community. Extreme developed the process. I have revised the process to accommodate multiple image sources and to safeguard photoshopping errors. For information on scanning, read Extreme's written scanning how-to and watch my short scanning how-to video.
Please Read Thoroughly
Please take the time to read this guide word for word. It is the product of years of experience and tradition carried out by the CCGHQ team. Please respect that over 22,000 cards have been processed using these techniques. If you would like to propose any change, post your recommendation for the CCGHQ team to review before adopting it.
Getting Started
Step 1) Slice & Export
Step 2) Classify and Name the Slices
Step 3) Crop & Dust
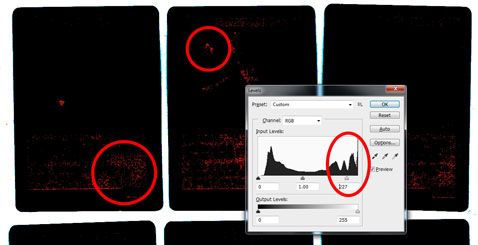
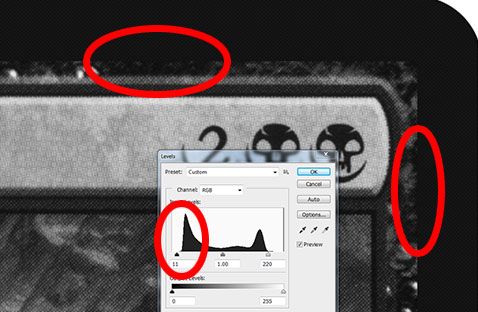
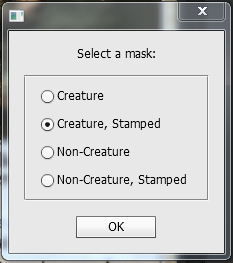
Step 4) Apply Masks & Adjustments
Step 5) Border, Output, & Upload
This guide outlines how to process raw card scans into high quality images for for the CCGHQ project and MTG community. Extreme developed the process. I have revised the process to accommodate multiple image sources and to safeguard photoshopping errors. For information on scanning, read Extreme's written scanning how-to and watch my short scanning how-to video.
Please Read Thoroughly
Please take the time to read this guide word for word. It is the product of years of experience and tradition carried out by the CCGHQ team. Please respect that over 22,000 cards have been processed using these techniques. If you would like to propose any change, post your recommendation for the CCGHQ team to review before adopting it.
Getting Started
- | Open


Step 1) Slice & Export
- | Open

Step 2) Classify and Name the Slices
- | Open


Step 3) Crop & Dust
- | Open


Step 4) Apply Masks & Adjustments
- | Open
Step 5) Border, Output, & Upload
- | Open
Last edited by skibulk on 07 Jul 2016, 17:01, edited 81 times in total.
-

skibulk - HQ Team Member
- Posts: 995
- Joined: 19 Jul 2010, 20:34
- Location: Northeast USA
- Has thanked: 379 times
- Been thanked: 335 times
Re: Scan Processing Tutorial (Join the Team)
![]() by skibulk » 06 Aug 2013, 21:40
by skibulk » 06 Aug 2013, 21:40
On Scanning:
I can't stress enough that dust doubles processing time. I just finished scanning a set of French Homelands, and I would like to share a technique that I have developed, which produces significantly cleaner scans. Watch my video. Jump to 3:50 if you only want to see the simple technique.
On Processing:
It's been 5 months since I posted this and I think only one member has used this tutorial. Extreme has stated that he may be retiring as our card processor in the not-so-distant future. While I have done some processing myself, I am too much of a perfectionist to do the job efficiently. I will continue to scan cards and vectorize card assets, but we still need people to join the processing team.
We have 8 Chinese sets, 1 German set, a slew of German Promos, and 1 French set yet to be processed. Extreme already has too much on his plate to get to these...
-
skibulk - HQ Team Member
- Posts: 995
- Joined: 19 Jul 2010, 20:34
- Location: Northeast USA
- Has thanked: 379 times
- Been thanked: 335 times
Re: Scan Processing Tutorial (Team Members Needed)
![]() by extreme » 07 Aug 2013, 11:42
by extreme » 07 Aug 2013, 11:42
Folks, that time is nearing fast. I'd hate to leave the project without a single ray of hope for the future 
Let me restate the advantages:
-err... eternal respect of the community ? lol. Scratch that
-I can only think of this: access to the 600 dpi processed scans of pretty much EVERYTHING except Proposal and some Summer cards. Stuff that is not (and probably won't be) released, basically, accumulated in many years of hard work from many people.
SCANNING HOW-TO: viewtopic.php?f=15&t=451
-

extreme - HQ Team Member
- Posts: 2794
- Joined: 18 Jan 2007, 14:38
- Has thanked: 111 times
- Been thanked: 562 times
Re: Scan Processing Tutorial (Team Members Needed)
![]() by skibulk » 07 Aug 2013, 13:05
by skibulk » 07 Aug 2013, 13:05
And It's not fair to ask one person to do all the work, as Extreme has done in the past (Thanks though)! Anybody willing and capable of doing this work for an average of 3 hours per month is eligible. A team of four Photoshoppers could easily keep the English portion of this project afloat at that rate.
@extreme - While you may not be processing in the future, I do hope you will stick around as an advisor / consult? Also, the scans that haven't been released yet are only of incomplete sets, right? (like Summer Magic, 4E Alternates, 10E Alternates, foreign sets)
@extreme - While you may not be processing in the future, I do hope you will stick around as an advisor / consult? Also, the scans that haven't been released yet are only of incomplete sets, right? (like Summer Magic, 4E Alternates, 10E Alternates, foreign sets)
-
skibulk - HQ Team Member
- Posts: 995
- Joined: 19 Jul 2010, 20:34
- Location: Northeast USA
- Has thanked: 379 times
- Been thanked: 335 times
Re: Scan Processing Tutorial (Team Members Needed)
![]() by Goblin Hero » 07 Aug 2013, 15:40
by Goblin Hero » 07 Aug 2013, 15:40
We need volunteers. I've stickied this topic as global announcement.
When you´re a goblin, you don´t have to step forward to be a hero -- everyone else just has to step back.
-

Goblin Hero - Site Admin

- Posts: 1992
- Joined: 23 Oct 2005, 09:37
- Location: Russia
- Has thanked: 218 times
- Been thanked: 351 times
Re: Scan Processing Tutorial (Team Members Needed)
![]() by extreme » 07 Aug 2013, 19:29
by extreme » 07 Aug 2013, 19:29
I'm not disappearing off the face of the Earth, of course I'll still be around, I might also do some work here and there, but I certainly won't be able to process pretty much everything, as I did so far.skibulk wrote:@extreme - While you may not be processing in the future, I do hope you will stick around as an advisor / consult? Also, the scans that haven't been released yet are only of incomplete sets, right? (like Summer Magic, 4E Alternates, 10E Alternates, foreign sets)
The stuff that is scanned and hasn't been completely processed yet only includes foreign sets - Chinese, German, a few Spanish Salvat decks and a French set scanned yesterday by skibulk. Partial sets include some 10E alternates - maybe Nyth will finish scanning this - and a few summer magic scans collected from ebay - certainly not a whole set. To my knowledge there is no alt 4th scan with the exception of the back. Anyway, I will leave everything in order and training is available
Now for the small print: I think 3 hours / month is a bit of an understatement - especially for beginners - but let's not scare the potentials away
I also want to heartily thank (not in any particular order) Goblin Hero, without whom we would not be here, Huggybaby for his energy and fun throughout the (almost 10) years, PresetM for most of the early scans and everybody else who contributed. It has been quite an adventure, with a lot of friendly, nice and helpful people along the masses of silent leechers and dumb requesters
But wotc prints way too many cards these days. Good for them, it's amazing how this game can continue year after year.
Now I'm off to be a rock star, baby !
SCANNING HOW-TO: viewtopic.php?f=15&t=451
-
extreme - HQ Team Member
- Posts: 2794
- Joined: 18 Jan 2007, 14:38
- Has thanked: 111 times
- Been thanked: 562 times
Re: Scan Processing Tutorial (Team Members Needed)
![]() by skibulk » 07 Aug 2013, 20:22
by skibulk » 07 Aug 2013, 20:22
I'm saying that's if we have multiple photoshoppers. Four people can averages 14.4 hours per set release. The core and expansion releases will take longer, and the preconstructed decks will take shorter. Here's my math:extreme wrote:I think 3 hours / month is a bit of an understatement - especially for beginners - but let's not scare the potentials away
- Code: Select all
Yearly Release Schedule
-----------------------
  1 Core Set
+ 3 Expansion Sets
+ 2 Duel Decks
+ 1 Premium Deck
+ 1 Commander Deck
+ 1 Variable Set
+ 1 Year's Promos
-----------------------
= 10 Sets/Year

Contributor Hours
-----------------
  04 People
x 03 Hours
x 12 Months
-----------------
= 144 Hours/Year
But we are already your groupies. Best of luck to you and thanks for everything!extreme wrote:Now I'm off to be a rock star, baby !
-
skibulk - HQ Team Member
- Posts: 995
- Joined: 19 Jul 2010, 20:34
- Location: Northeast USA
- Has thanked: 379 times
- Been thanked: 335 times
Re: Scan Processing Tutorial (Team Members Needed)
![]() by extreme » 07 Aug 2013, 20:42
by extreme » 07 Aug 2013, 20:42
That's surprising, it seems correct, but it sure feels like being more when you do it solo.
But that's only the English sets, don't forget
Thanks, so I assume you'll be one of the 4 ?
But that's only the English sets, don't forget
Thanks, so I assume you'll be one of the 4 ?
SCANNING HOW-TO: viewtopic.php?f=15&t=451
-
extreme - HQ Team Member
- Posts: 2794
- Joined: 18 Jan 2007, 14:38
- Has thanked: 111 times
- Been thanked: 562 times
Re: Scan Processing Tutorial (Team Members Needed)
![]() by skibulk » 07 Aug 2013, 20:54
by skibulk » 07 Aug 2013, 20:54
I don't place high value on Modern foreign sets since we're given MQ images on Gatherer. Classic sets I would like to have, but those aren't pouring in right now. And the foreign Promos I care about, but there aren't many of those either.extreme wrote:That's surprising, it seems correct, but it sure feels like being more when you do it solo.
But that's only the English sets, don't forget
Thanks, so I assume you'll be one of the 4 ?
I'd rather not be one of the four. I already put in a lot of time vectorizing card assets, among other things. If people want the images, and we know they do, we will get helpers. I'll bet that once we're two or three sets behind, volunteers will crop up.
-
skibulk - HQ Team Member
- Posts: 995
- Joined: 19 Jul 2010, 20:34
- Location: Northeast USA
- Has thanked: 379 times
- Been thanked: 335 times
Re: Scan Processing Tutorial (Team Members Needed)
![]() by Huggybaby » 08 Aug 2013, 04:12
by Huggybaby » 08 Aug 2013, 04:12
Yes, I think I told extreme already, that if we get far enough behind, help will show up. That's the way it seems to work. But I know one thing for certain, without help, we won't be releasing anything.
When this project started, we didn't have Gatherer images, and now we do, and not only that, we have more than one excellent utility to download them automatically, thanks to our contributors. So we can always play using images. But I know for a fact that there are a large group of people who appreciate more.
PS extreme should link to his music, it's excellent. He plays keys tastefully, with sounds and notes expertly chosen to compliment each arrangement, and this is where his nick comes from:
http://www.soundonsound.com/sos/may04/a ... xtreme.htm
-

Huggybaby - Administrator
- Posts: 3205
- Joined: 15 Jan 2006, 19:44
- Location: Finally out of Atlanta
- Has thanked: 696 times
- Been thanked: 594 times
Re: Scan Processing Tutorial (Team Members Needed)
![]() by extreme » 08 Aug 2013, 09:53
by extreme » 08 Aug 2013, 09:53
sorry guys, I'd love to, but I'm not very comfortable with my identity made public here.
SCANNING HOW-TO: viewtopic.php?f=15&t=451
-
extreme - HQ Team Member
- Posts: 2794
- Joined: 18 Jan 2007, 14:38
- Has thanked: 111 times
- Been thanked: 562 times
Re: Scan Processing Tutorial (Team Members Needed)
![]() by woogerboy21 » 09 Aug 2013, 03:12
by woogerboy21 » 09 Aug 2013, 03:12
Having done many of the steps listed in your photoshop automation files (only manually as well as in other programs such as gimp) I sat down tonight and tried using your steps. One thing I noticed is that Skibulk and Extreme have different automation tasks. For instance, Extreme has a step that applies a Gaussian Blur of 0.5 but I didn't see that in skibulk's? Am I overlooking this in skibulk's or do you guys prefer people that would like to help to follow one automation script steps over another?
-

woogerboy21 - HQ Team Member
- Posts: 1136
- Joined: 19 Jul 2009, 00:15
- Location: USA
- Has thanked: 21 times
- Been thanked: 152 times
Re: Scan Processing Tutorial (Team Members Needed)
![]() by skibulk » 09 Aug 2013, 08:39
by skibulk » 09 Aug 2013, 08:39
Well I re-wrote some of the actions for my local file system. And some of the steps were slightly redundant, so my set is tweaked a bit. I also added an automated version of the Planeswalker framing. I seem to have missed the Gaussian Blur step! Extreme knows best, so go ahead and use his script, or add that step back into mine. I've also added a temporary levels adjustment before cropping and slicing, to make the edges of the cards more visible. Afterwards that is deleted. I think I'm renaming the cards earlier too, because that makes all of the versions afterwards named correctly as well.
-
skibulk - HQ Team Member
- Posts: 995
- Joined: 19 Jul 2010, 20:34
- Location: Northeast USA
- Has thanked: 379 times
- Been thanked: 335 times
Re: Scan Processing Tutorial (Team Members Needed)
![]() by woogerboy21 » 09 Aug 2013, 14:31
by woogerboy21 » 09 Aug 2013, 14:31
Whom would we contact to submit a processed image for review to see if you guys would like someone to help process the images? (Or were you wanting something like a complete set processed for review?)
Also, are you guys interested in the steps for GIMP?
Also, are you guys interested in the steps for GIMP?
-
woogerboy21 - HQ Team Member
- Posts: 1136
- Joined: 19 Jul 2009, 00:15
- Location: USA
- Has thanked: 21 times
- Been thanked: 152 times
Re: Scan Processing Tutorial (Team Members Needed)
![]() by Huggybaby » 09 Aug 2013, 15:21
by Huggybaby » 09 Aug 2013, 15:21
For now send a sample to extreme.
We're always interested in new and improved documentation. We'd love to have instructions for using GIMP, unless for some reason it can't do the job Photoshop.
We're always interested in new and improved documentation. We'd love to have instructions for using GIMP, unless for some reason it can't do the job Photoshop.
-
Huggybaby - Administrator
- Posts: 3205
- Joined: 15 Jan 2006, 19:44
- Location: Finally out of Atlanta
- Has thanked: 696 times
- Been thanked: 594 times
Who is online
Users browsing this forum: No registered users and 33 guests